Light bulbs for the Kia K4
Contents:
- Bulb replacement precautions for the Kia K4
- Light bulb position (Front)
- Light bulb position (Rear)
- Replacing lights (LED type)
- Replacing turn signal and stop lamps (Rear combination lamp, Bulb type)
Your Kia K4 is equipped with a comprehensive array of light bulbs designed to provide optimal visibility, ensure cabin comfort, and effectively signal your intentions to other drivers on the road. Maintaining these components is essential for vehicle safety and performance.
Bulb replacement precautions for the Kia K4
To ensure readiness for any unexpected maintenance needs, we recommend keeping a set of spare light bulbs with the appropriate specifications in your Kia K4. For detailed information regarding the correct bulb types and power requirements, please consult the "Bulb wattage" section of your owner's manual.
When performing a bulb replacement, ensure the Kia K4 is parked in a secure location. Press the ENGINE START/STOP button to the OFF position, firmly engage the parking brake, and disconnect the battery's negative (-) terminal to prevent accidental electrical discharge.
CAUTION
Working on the lights
Before initiating any maintenance on the lighting systems of your Kia K4, ensure the parking brake is firmly applied, the ENGINE START/STOP button is set to the LOCK position, and all light switches are in the OFF position. This protocol prevents sudden vehicle movement and protects you from potential finger burns or electric shock caused by hot or energized components.
NOTE
Light replacement guidelines
To avoid damaging the fuse or the complex electric wiring harness of your Kia K4, always use replacement bulbs with the exact same wattage rating as the original component. Utilizing incorrect wattage can lead to system-wide electrical failures.
To prevent potential heat damage, fire hazards, or moisture ingress, ensure that every bulb and its corresponding locking mechanism are fully seated and securely locked into the headlamp unit. Failure to properly seal these components may cause significant damage to the headlamps or result in persistent condensation buildup on the inner lens surface.
NOTE
Headlamp lens maintenance
To preserve the clarity and structural integrity of the Kia K4 headlamp lens, never clean the surface with harsh chemical solvents, abrasive materials, or high-strength detergents, as these can permanently cloud or degrade the polycarbonate material.
TIP
-
If a bulb or lamp connector is detached while the system is powered ON, the electronic control system of your Kia K4 may log this as a malfunction. Consequently, the vehicle's fuse box may record a Diagnostic Trouble Code (DTC) related to the lamp system.
-
It is normal for an operating LED lamp on a Kia K4 to flicker momentarily during startup; this is a result of the stabilization function within the vehicle's electronic control device. If the lamp illuminates steadily after this brief period, it is operating within normal parameters.
However, if you observe continuous flickering or if the lamp fails to illuminate entirely, this may indicate an underlying error in the vehicle's electronic control modules. In such instances, please have your Kia K4 inspected by an authorized Kia dealer immediately.
NOTE
Headlamp alignment
Following any accident, collision, or physical removal and reinstallation of the headlamp assembly, it is crucial to have the headlamp aim professionally adjusted by an authorized Kia dealer to ensure correct road illumination and avoid blinding oncoming traffic.
TIP
Understanding lamp condensation
After washing your Kia K4 or driving through heavy rain, you may notice transient moisture inside the lamp lenses. This is standard condensation caused by a temperature differential between the interior and exterior of the lens housing and does not reflect a functional defect. Typically, this moisture will dissipate after driving with the headlamps switched ON. If moisture persists or accumulates into standing water, please have your vehicle inspected by an authorized Kia dealer.
If you lack the specialized tools, the correct replacement bulbs, or the technical expertise required to perform these tasks, we strongly recommend consulting an authorized Kia dealer. Replacing lighting components on a modern vehicle like the Kia K4 can be complex, as it often requires the removal of surrounding body panels or the entire headlamp assembly to gain proper access.
Attempting to remove or reinstall these assemblies without proper training risks damaging the vehicle. Furthermore, using non-genuine parts or substandard aftermarket bulbs may blow a fuse, damage the vehicle's wiring harness, or void portions of your warranty.
Avoid installing unauthorized extra lamps or aftermarket LED kits on your Kia K4. Modifying the lighting system with unapproved parts can lead to severe malfunctions, persistent flickering, or significant damage to the vehicle's integrated fuse box and central electronic control architecture.
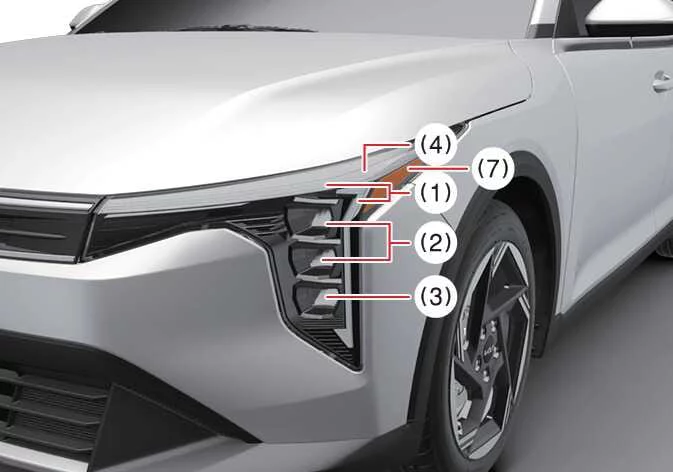
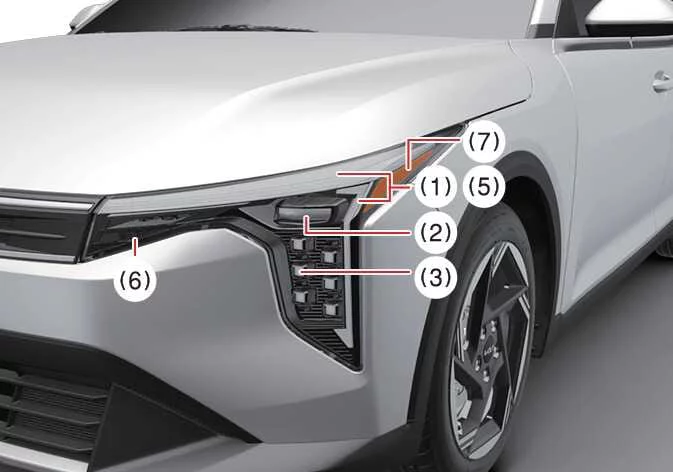
Light bulb position (Front)
The Kia K4 features advanced front lighting configurations. Depending on your specific trim level, the arrangement and technology used for the lamps may vary. Refer to the diagrams below to identify the precise location of each component on your Kia K4.
|
|
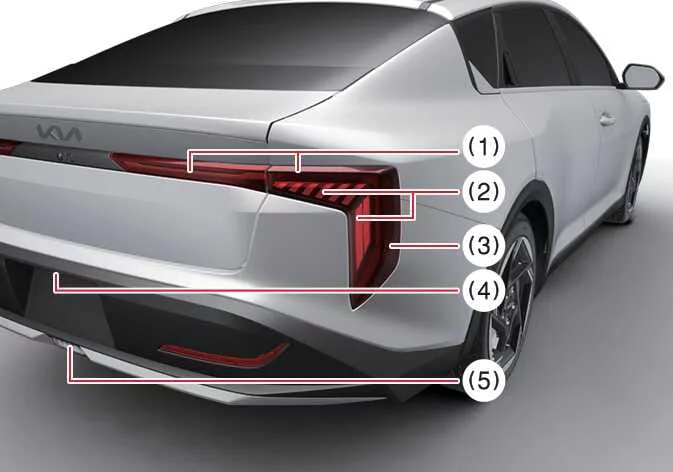
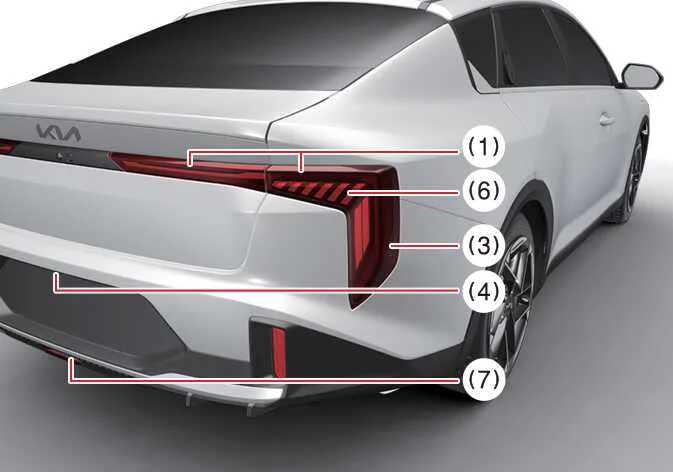
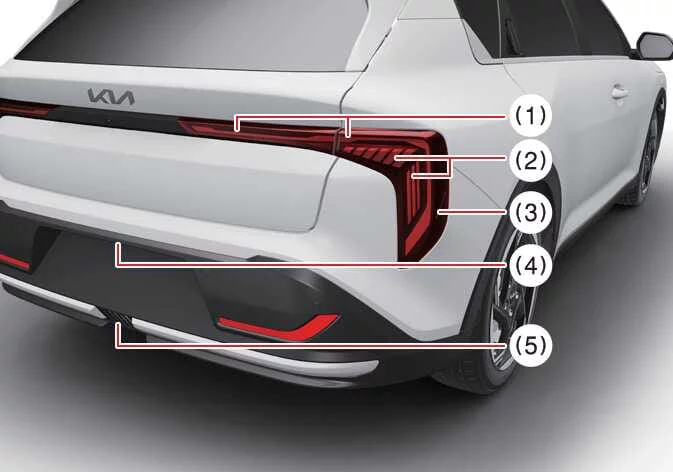
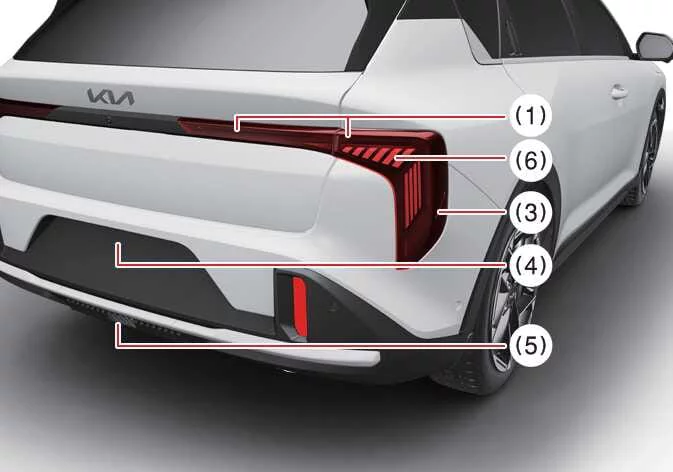
Light bulb position (Rear)
The rear lighting system of the Kia K4 is designed for optimal visibility and modern aesthetics. Whether you own the 4-door sedan or 5-door hatchback variant, identifying the correct light source is vital for maintenance.
|
|
Replacing lights (LED type)
Modern LED lighting in the Kia K4 is engineered for longevity and high performance. Because these are integrated light-emitting diode units, they cannot be serviced by replacing a single bulb. If an LED lamp fails to illuminate, the entire assembly must be replaced to ensure system integrity.
We strongly advise that a professional technician at an authorized Kia dealer inspects and replaces any malfunctioning LED units. Improper handling can cause short circuits or damage to the sophisticated electronic modules of the Kia K4.
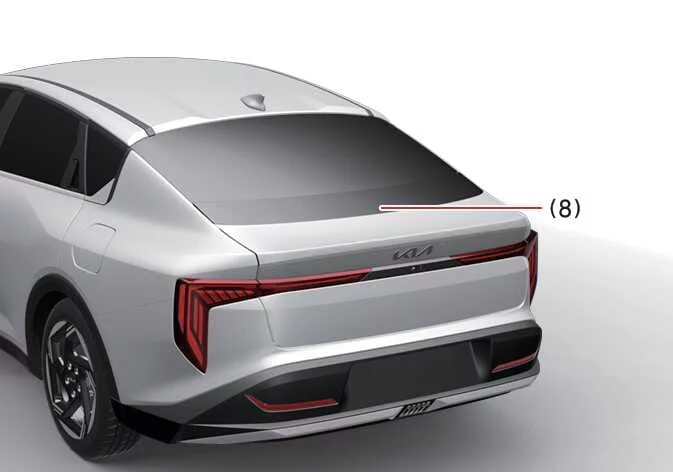
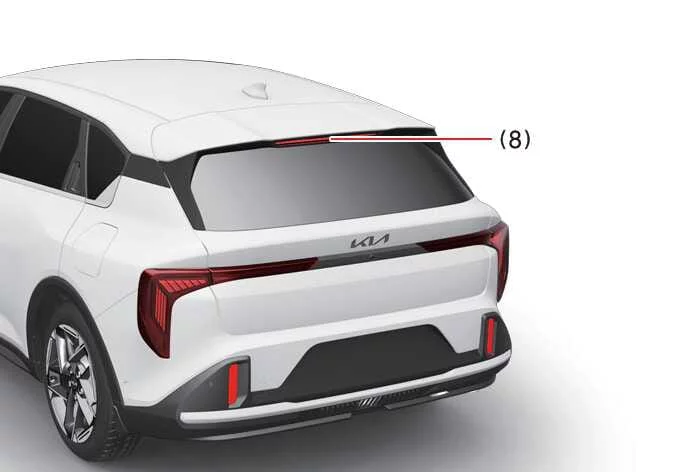
This requirement applies equally to the high-mounted stop lamp (LED). If this component fails, please consult your local Kia service center. Professional replacement is essential to maintain the structural and electrical safety standards of your vehicle.
Replacing turn signal and stop lamps (Rear combination lamp, Bulb type)

|
|
To safely replace the brake or turn signal bulbs (Bulb type) on your Kia K4, please follow these systematic instructions:
- Ensure the Kia K4 is powered off by pressing the ENGINE START/STOP button to the OFF position, and disconnect the battery's negative (-) terminal to ensure safety.
- Open the trunk or liftgate to gain access to the rear lighting area.
- Open the internal service access cover behind the lamp assembly.
-
4-Door model: Carefully remove the retaining nuts and pull the lamp assembly outward.
5-Door model: With the liftgate opened, remove the flange cover, unscrew the retaining screws using a Phillips head screwdriver, and gently pull the lamp assembly out from the body.
- Completely detach the rear combination lamp assembly from the vehicle body.
- Carefully disconnect the electrical connector from the rear of the lamp assembly.
- To extract the bulb socket, rotate it counterclockwise until the locking tabs align with the slots in the housing.
- Depress the bulb slightly into the socket and rotate it counterclockwise to release it from the socket.
- Insert a new, genuine bulb into the socket, ensuring it is properly seated, and rotate it clockwise until it locks securely into place.
- Reinsert the socket into the assembly by aligning the tabs, pushing it in, and rotating it clockwise until firm.
-
4-Door model: Align the lamp assembly with the body, press into place, and tighten the mounting nuts securely.
5-Door model: Reinstall the assembly to the body and tighten the retaining screws using a Phillips head screwdriver.
- Close the internal service cover and reconnect the battery to test the new bulb function.


Other information:
Kia K4 (CL4) 2025-2026 Owner's Manual: Engine compartment fuse replacement
For fuses located within the engine compartment fuse panel of your Kia K4, follow these maintenance steps: Verify that the ENGINE START/STOP button and all vehicle systems are in the OFF position. Open the engine compartment and remove the fuse panel cover by depressing the retaining tabs and lifting the cover upward. Use the integrated fuse puller located inside the engine compartment fuse panel to extract the suspected fuse.If you identify chips, deep scratches, or other damage to the paint finish of your Kia K4, address these areas promptly to prevent the onset of corrosion. Small surface imperfections can often be repaired using genuine touch-up paint specifically formulated for your vehicle's color code. For larger areas of paint damage or structural bodywork issues, we recommend visiting an authorized Kia dealer to ensure the repair matches the factory standards and preserves your vehicle's long-term protection.
Contents
- Bulb replacement precautions for the Kia K4
- Light bulb position (Front)
- Light bulb position (Rear)
- Replacing lights (LED type)
- Replacing turn signal and stop lamps (Rear combination lamp, Bulb type)
Categories
- Manuals Home
- Kia K4 Owners Manual
- Questions & Answers
- Video Guides
- Useful Resources
- New on site
- Most important about Kia K4
- Privacy Policy